This page describes C34 owners' galley upgrade
projects.
Please contribute
yours!
Galley Sink Covers
The C34 is very short on counter space in the galley. To
compensate, I purchased a 12x32x1/2 piece of white polyboard
(similar to what cutting boards are made of) for $20. I cut it
to fit both sinks (two pieces). At the aft inboard corner of
each piece (as looked at while standing at the sink) I cut a
one inch hole as a finger hole in order to lift the boards up
and out. It works great and adds plenty of counter space. In
fact, we usually leave one cover in place all the time (Lou
Berman, Second Wind, #1366, 1997).
Galley Counter Top Making and Installation
Items needed for new top: 4' x 8' exterior grade, good one
side plywood. $40 (Watch the number of plys that the plywood
is made up of, 7ply is what I used, more is better) Your
choice of Wilson Art / Formica, one sheet 4' x 8' $65 Formica
glue, roller, brush and router. Using the old counter for a
template, trace out the exact shape on the new plywood. You
will notice that four inches of the old counter stick over the
new wood. (at rear of stove). To solve this problem, I glued
and screwed a four-inch wide piece of clear pine, 12"
long to that corner of the new plywood. This way the old top
can be traced onto full size wood. Plywood only comes in
four-foot widths, unless you want to pay big $. Trace out the
sink and ice box openings also. Now using a skill saw and a
saber saw, cut out the outline of the counter and the sink
opening, not the icebox opening. Measure in 3 inches all
around the icebox opening and cut out this smaller opening
(more on this in a moment). Using a belt sander, sand all the
edges to the template lines. Remember that all the edges are
covered with teak so a little off is ok. Locate the edge that
butts to the hull (back of stove side!) and with the belt
sander grind this surface back at a 45-degree angle. This will
give the counter the relief that it needs to get a good fit.
NOTE: A modification that I made to the top was adding 2
inches in widthinback of the stove. You must do this before
you cut out your new counter. It will involve cutting
the finish teak to the left of the stove 2 inches shorter
before re-installing.
TIME TO TAKE IT TO THE BOAT AND SEE HOW WELL IT FITS!!! Is
the stove too close to the new counter if you added on?
Remember you have to have room fortheteak. In the small hole
that you cut out at the ice box...stick your hand in with a
pencil and trace the out line of the ice box on the back of
thecountertop.TAKE BACK HOME!
Turn the counter upside down so you can see the outline of
the icebox opening you drew. Draw straight lines 3/8 inch
bigger than these lines all around. This will give you a 3/8
lip all around the box for the lid to sit in. Neatly, using a
skill saw and finishing the corners with a sabersaw, cut out
on this line. Make marks with a pencil so you know which way
to put it back when we use it for a cover. After the edges of
the icebox opening are covered in Formica and routed, (I will
cover this in a moment) I glue 3/8 storm door rubber
insulation to the back of the box opening all around.The
insulation has a 3/8 round portion and a 1/4 inch flat part
for fastening.This flat area is what gets glued to the back of
the opening, with the round sticking into the box opening as a
seal. When you look down from the top you only see the round
insulation that the lid sits on. The only disadvantage is that
you will have to cut it off with a knife if you ever need to
replace it.The other method would be to glue 3/8 wide
insulation to the box lip after the counter is installed. Lets
do the Formica before tackling the lid.
Laminating Formica is not all that hard. Using the counter
as a template, trace it on to the back of the Formica, counter
top upside down also.You will have to seam the Formica
somewhere in back of the stove; again 4-foot wide material was
cheaper. Rough cut the Formica at least 1 inch bigger than
your outline to leave room for error and placement when
gluing. Rough cut the small piece for the back of the stove
and belt sand the seam till it fits nicely. Also, cut
4-1 inch wide pieces to perfectly fit the inside lengths of
the icebox opening. Set up a large work area so that you have
the countertop faceup and the Formica upside down. Brush
contact cement on the edges around the ice box opening, let
dry....all wood surfaces get two coats of glue. Re-coat
opening and coat pieces that will be laminated there. Let dry
to touch and place all around opening. Tap with rubber mallet
to insure good bonding. Use belt sander to finish these
strips around the opening flush with the countertop. Flip top
over and sand flush with bottom also. Now we are ready to
laminate the top. Make sure all surfaces are clean. Coat
counter top with contact cement. Roller made for this works
best. Brush is difficult but ok. Let dry. Coat top a
second time and also coat back of Formica. Place long CLEAN
sticks on top of the counter so that the Formica can be laid
on top of the counter WITHOUT touching it. 3/8 inch round
dowels, 3 feet long are perfect for this, but almost anything
small and long will due, including something metal. Line up
the Formica on top of the counter....starting from one end,
pull out the spacer and touch the Formica to the top. Once
touched it will not come loose. Work your way one spacer at a
time, rubbing out any air bubbles as you go. No spacers needed
for the small piece behind the stove, just push the seams
together first as you lay the piece down. Take your router
with a ball bearing Formica bit and cut out around all edges.
REMEMBER that the rear edge is a 45 angle so router will not
work on that face. Use the beltsander there. Poke hole at
icebox and sink and route around those edges. Sand edges of
Formica smooth around the ice box opening using 120 sandpaper
on a small wooden block. Refasten teak fiddles all around
counter and plug screwholes.
ICEBOX LID: I used the same 3/4 ply that came from the
opening that I cut.WHAT TO DO WITH THE SMALLER HOLE IN THE
CENTER?????? Fill it with 3/4inch solid foam!!!!!! We need
more insulation. Important to remember here that the lid
needs Formica all around its edges. Some sanding before
Formica may be needed to get a good fit. Also if you are using
this cut out that the inside edges have to be recessed for the
insulation or the cover will sit to high. Cover the top and
edges with Formica screw on the inside foam insulation and you
have your lid. Cutting down the old 1/2 inch lid and
recovering with Formica will also do. Another change I made
here is to hinge the top. The only thing I do not like about
this is it hits the upper shelf not allowing us total access
to the opening of the icebox.INSTALLATION: Place the counter
top on a few dabs of silicone and screwup from underneath as
before. I did not like being on my head so much so I put the
sink in, outlined it in light pencil and removed it again. I
noticed that the sink overlaps well over an inch. On that
overlap I did my screws from the top down. Drill/countersink 8
screws spaced around sink. Replace the two screws through the
aft cabin bulkhead. Place the teak dish holder on the counter
behind the stove, mark with pencil its width and remove.
Drill/countersink 2 screws under this teak to fasten counter.
Fasten teak dish holder in place as before. Put lots of
silicone around the sink, set sink in place, plug drain fill
with water to hold sink firmly in place till dry. If this is
something that should be submitted to the main sheet, I will
need help!!!! I am new and do not know how this would be done.
I have it on disc and took some pictures. (Capt Al#55
"kindred Spirit)"
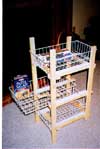
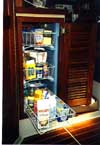
Galley Food Storage Shelves in The Hanging Locker
Click on any picture to enlarge it
How to Build Pull out Shelves
For the Galley
Since we downsized from a 37' LARGE
sailboat, we (Michele) was not happy with the available
food storage in the galley. Basically there is none.
Before I could fill up the hanging locker opp the galley
with my very important tools, oil, etc Michele told me
what it was for, canned and boxed food. I had to agree
and still have not found a good spot for my many tools.
So we but our heads together and came up with a great
storage system. I made a deal with Michele to build the
shelf unit and she would paint the locker before I
install it. If you want it to look nice the whole locker
must be painted....the shelves are wire see through.
Description of storage unit:
Close head door, open cabinet door and you see three
10 inch wide by 20 inch long wire rack shelves that are
5 inches high each. The best part is that the shelves
slide out 15 inches so you can reach all items. Even
better is the fact that I can slide the bottom shelf
totally out (must lift over the shelf stops) and all my
6 cans of oil fit under the shelf. The shelves filled
with heavy items (peanut butter, soda, etc) is not a
problem.
Construction Materials:
Three CLOSETMAID Kitchen Cabinet Organizer pull out
basket #3991 for an 11 inch opening (unit 10 1/4w x 5
1/4 h x 20 deep). WHERE: HOME DEPOT $10.67each. Three 1
x 2 x 8 feet finish pine wood boards and 1 1/4 long
sheet rock screws. Galv if you like but not necessary.
Construction:
The shelves come with slides that mount under them so
the sides of the shelves are free. Cut two boards (here
on in boards means a 1 x2 piece of wood) 18 inches
long....mount the shelf slide on the wide side of each
board and close to one edge. Place the shelf in these
two slides on a flat surface like a work bench. Now you
have the shelf on top of the 1 x2 in its track but we
need something to keep the tracks equal distance apart.
Turn the whole thing upside down (in Theory) and attach
two boards (about 12 1/8 inches long), one, three inches
back from the front and one on the rear edge to hold the
tracks apart, only put one screw in each board. Flip
rightside up and slide the shelf in and out of its
tracks. If it is too tight or loose, rescrew the bottom
spacer till you get it right. Do this for all three
shelves and you will now have three nice sliding shelves
for the top of your work bench....the next step is
getting them on top of each other with spaces and be
able to fit it to the boat. If you hold one unit 10
inches directly above the first and another one above
that, all we need is 4 boards, one on each side corner
to act as legs. This would be all if we were putting
this above the work bench. If you remember the shape of
the nav cabinet it drops down behind the door, so the
front legs must go down 6 1/4 inches below this first
draw (one screw only in each board). The rear legs are
only 2 1/4 inches below the shelf unit because the hull
rounds up in this area. Well if you put this all
together as described, you have one crooked looking
shelf unit on your work bench. I put a temporary leg in
the middle of the back (about 4 inches long) so I could
keep it level and bring it to the living room to show my
lovely wife...add a few food items for effect first!
This is a good point to remove all the plastic slides
and paint all the surfaces of the 1 x 2's that will be
showing. I did not do this, I took all the plastic
slides off after it was installed in the boat...I like
working upside down and in cramped quarters.
So why have we only put one screw in each board? The
next part is magic...remove all three shelves from the
unit you just built....grab the middle shelf slide sides
and move one hand forward and one hand back...it folds
like a cloths hanging rack...if you did it right it also
tilts in the up and down direction. All these moves are
what will allow you to slide it into the nav locker in
ONE piece. Once you have it in, bend it back to shape,
move it around till the bottom shelf is above the door
lip and it is equally spaced in the opening. Make sure
that it is set back just enough to close the door
without interference. Mark with a pencil where the front
legs are with respect to the interior wall of the head
and nav wall. Note the space between these legs and the
walls. Place a small filler on each side (top and
bottom) to take up this space. I screwed in the (I
needed 3/4 inch each side so a 3 inch 1 x 2 worked)
fillers after moving the shelf unit aside and then with
the unit in place screwed it to the spacers on the front
legs. I did not attach the rear legs. It was plenty
strong. I did have to place a board between the bottom
shelf cross support to the hull to hold the rear at the
right height. If all fits well and you are not taking it
out again, you can take out the front spacers that are
holding the draw slide apart...the unit is supported by
the side walls now, they are not doing anything...don't
remove the rear, they are holding the spacing of the
slides in the rear. I have a detailed drawing if not
printed in the Mainsheet, will gladly send to anyone who
needs it.
Al and Michele #55 "Kindred Spirit" |
|